Pro-Active Training Manual
Welcome to the official staff training guide for the Pro-Active B2C/D2C eCommerce Platform by Cutting-Edge Solutions. This manual covers every page and feature of the administration panel with detailed, step-by-step instructions.
📋 How to Use This Manual
Navigation
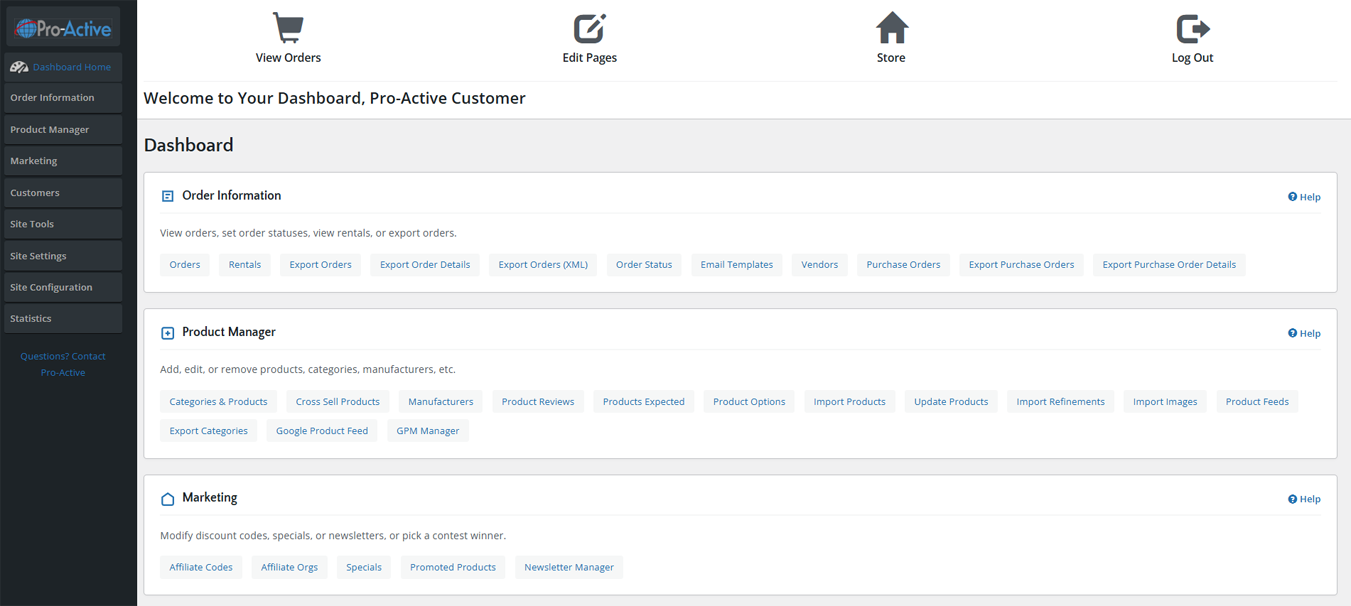
- Use the top navigation bar to jump between the 9 main sections of the admin panel.
- Use the left sidebar to jump directly to any sub-section within a topic.
- Each section opens with an overview, a table of contents, and a screenshot of the actual admin page.
- Step-by-step instructions are numbered and describe every click, field, and button.
- Green callouts (Tip) highlight best practices. Orange callouts (Warning) flag actions needing extra care.
- Screenshot placeholders reference images you should upload to /faqs/ on the server.
- To print a section as PDF: view that section and press Ctrl+P → Save as PDF.
🗺️ Platform Overview
📊 Dashboard
Your command center. Shows best-viewed products, order summaries, and quick links to every module in the system.
🛒 Order Information
Manage all customer orders, rentals, purchase orders, order statuses, vendors, email templates, and export tools.
📦 Product Manager
Create and manage categories, products, cross-sells, manufacturers, reviews, product options, imports, and feeds.
📣 Marketing
Affiliate codes, affiliate organizations, specials (sale prices), promoted products, and newsletter manager.
👥 Customers
View and manage customer accounts, send bulk emails, view who is shopping online, and manage auto-billing subscriptions.
🔧 Site Tools
Create and edit informational pages (About Us, Privacy Policy, etc.) and manage eBay product export.
⚙️ Site Settings
Choose templates, set layout colors, upload logos, configure menus, slideshows, shipping/payment/tax modules, and currencies.
🔩 Site Configuration
Configure all global store settings: store name, min/max values, image sizes, customer detail fields, shipping rules, stock management, and more.
📈 Statistics
View in-depth analytics: products viewed/purchased, customer order totals, unsold carts, conversion rates, and full audit trail.
🔐 Logging Into the Admin Panel
How to Access the Admin Panel
- Open your web browser and navigate to your store's admin URL, typically: https://yourdomain.com/storeadmin/index.php
- Enter your administrator Username and Password in the login form.
- Click the Login button. You will be taken directly to the Dashboard.
- To log out at any time, click the Log Out icon in the top navigation bar of the admin panel.
🧭 Admin Panel Interface
The admin panel interface has three main areas:
| Area | Location | Function |
|---|---|---|
| Top Quick Links | Very top of page | View Orders, Edit Pages, Store (front-end), Log Out |
| Left Sidebar Menu | Left column | Main navigation: Dashboard Home, all section menus with expandable sub-items |
| Content Area | Right / main panel | Displays the current page content: lists, forms, settings, etc. |
📊 Dashboard
URL: /storeadmin/index.php — Your command center and starting point for all admin activity.
📋 Overview
The Dashboard is the first page you see after logging in. It shows your store's Best Viewed Products — a live, ranked list of the products customers have viewed most on your storefront. The left sidebar contains expandable menus for every section of the admin panel.
🔗 Top Quick Links
| Link | What It Does |
|---|---|
| View Orders 🛒 | Jumps directly to the Orders list page, showing all customer orders. |
| Edit Pages ✏️ | Opens the Information Pages editor — Add/Edit Pages like Privacy Policy, About Us, etc. |
| Store 🏠 | Opens your live storefront in the same tab so you can see how the site looks to customers. |
| Log Out 🚪 | Ends your admin session and returns you to the login page. |
📊 Best Viewed Products
The main content area of the Dashboard displays a paginated table of the most-viewed products on your store. Columns include:
| Column | Description |
|---|---|
| No. | Rank position (01, 02, 03…) |
| Products | Clickable product name — click to view product detail in Statistics |
| Viewed | Total number of times the product page has been viewed by shoppers |
The table is paginated — use the page selector dropdown or the >> arrow to move to the next page. There are 15 products per page.
📌 Sidebar Navigation
The left sidebar contains the main menu. Each top-level item expands to show sub-pages. Click any section header to expand or collapse it. Click any sub-item to navigate to that page.
| Menu Section | Sub-Items |
|---|---|
| Order Information | Orders, Rentals, Export Orders, Export Order Details, Export Orders (XML), Order Status, Email Templates, Vendors, Purchase Orders, Export Purchase Orders, Export Purchase Order Details |
| Product Manager | Categories & Products, Cross Sell Products, Manufacturers, Product Reviews, Products Expected, Product Options, Import Products, Update Products, Import Refinements, Import Images, Product Feeds, Export Categories, Google Product Feed, GPM Manager |
| Marketing | Affiliate Codes, Affiliate Orgs, Specials, Promoted Products, Newsletter Manager |
| Customers | Customers, Send an Email, Who's Online, Auto Billing |
| Site Tools | Add/Edit Pages, eBay Export |
| Site Settings | Templates, Layout Colors, Logos, Menu, Slideshow, Social, Homepage Modules, Shipping Modules, Payment Modules, Order Total Modules, Tax Rates, Tax Zones, Tax Classes, Countries, Zones, Currencies |
| Site Configuration | My Store, Minimum Values, Maximum Values, Images, Customer Details, Shipping/Packaging, Product Listing, Stock, Ebay Export, Infosync, Drawings/Contests, Google Checkout, Scheduler, Auto Billing, Staff Bios |
| Statistics | Products Viewed, Products Purchased, Customer Orders (Total), Unsold Carts, Conversion Rates, Order Statistics, Audit Trail |
🛒 Order Information
Manage all customer orders, rentals, purchase orders, order statuses, email notifications, and vendor relationships.
📋 Orders
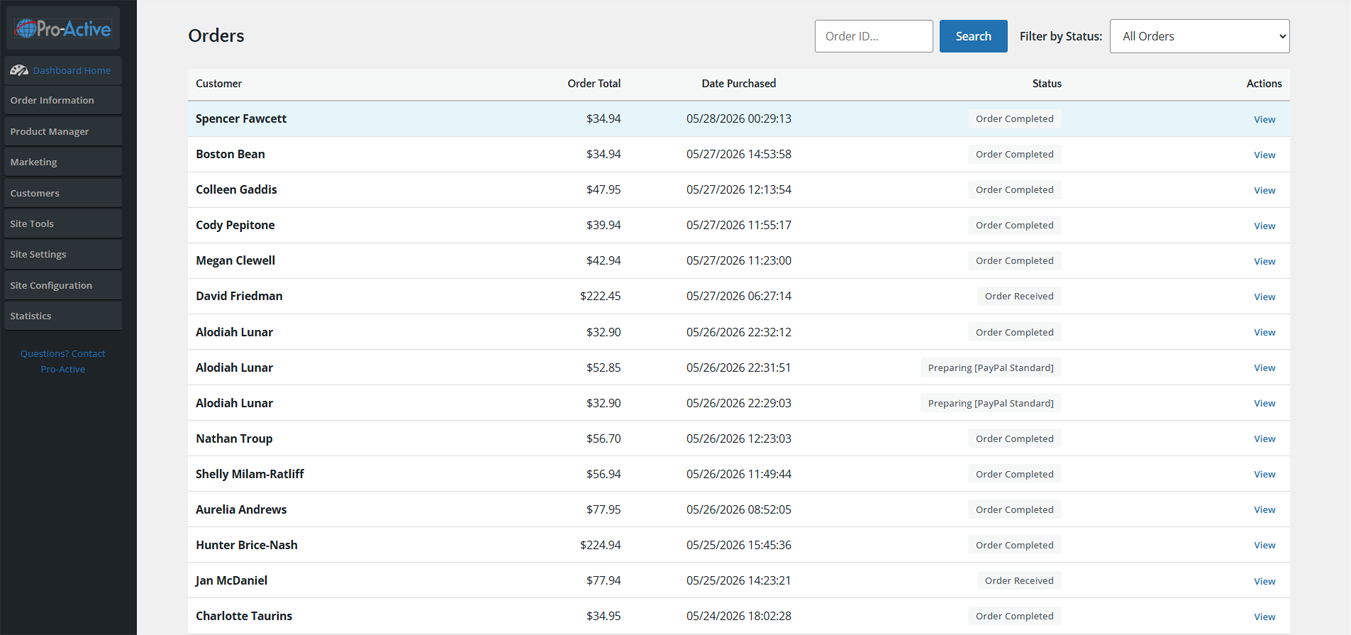
The Orders page shows all customer orders placed through your store. Each row displays the customer name, order total, date, and current status.
Viewing Orders
How to View All Orders
- Click Order Information in the left sidebar, then click Orders (or click "View Orders" in the top quick links).
- The Orders list appears. By default, it shows all orders sorted by date.
- Use the Filter by Status dropdown to filter orders by a specific status (e.g., Pending, Shipped, Cancelled).
- To search for a specific order, enter the Order ID in the search box and click Search.
Order List Columns
| Column | Description |
|---|---|
| Customer | Full name of the customer who placed the order. Bold = most recent. |
| Order Total | Total dollar amount of the order including shipping and tax. |
| Date Purchased | Date and time the order was placed (format: MM/DD/YYYY HH:MM:SS). |
| Status | Current order status (e.g., Order Pending, Order Shipped, Order Cancelled). |
| Actions | View link — click to open full order detail. |
Viewing an Order in Detail
Steps to View a Single Order
- From the Orders list, click the View link next to the order you want to review.
- The Order Detail page opens, showing: customer billing/shipping addresses, order items (product name, quantity, price), order totals (subtotal, shipping, tax, grand total), and order history/comments.
- To update the order status: scroll to the Order History section, select the new status from the dropdown, enter a comment if desired, and check "Notify Customer" if you want to email them automatically.
- Click Update to save the new status.
- To print the invoice: click the Invoice button at the top of the order detail page.
- To print a packing slip: click the Packing Slip button.
🔄 Rentals
The Rentals page lists all orders that contain rental products. This is only relevant if your store sells items on a rental/subscription basis. The interface is identical to the standard Orders list but filtered to rental-type orders.
📤 Export Orders
The platform provides several export options to download your order data for use in accounting, fulfillment, or reporting software.
| Export Type | URL | What It Exports |
|---|---|---|
| Export Orders | /storeadmin/orders_export.php | All order header data (customer, totals, dates, status) in CSV/tab-delimited format. |
| Export Order Details | /storeadmin/orders_export_detail.php | Full line-item detail per order (product name, SKU, quantity, price per item). |
| Export Orders (XML) | /storeadmin/orders_export_xml.php | All orders in XML format — useful for ERP and accounting system integrations. |
| Export Purchase Orders | /storeadmin/po_export.php | Purchase orders in CSV format. |
| Export PO Details | /storeadmin/po_export_detail.php | Purchase order line-item detail in CSV format. |
How to Export Orders
- Navigate to Order Information → Export Orders (or the specific export type you need).
- Select a date range (Start Date and End Date) using the date pickers.
- Select the desired Order Status filter or leave as "All" to export all orders.
- Click the Export button. A file download will begin automatically.
- Open the downloaded file in Excel or your accounting software.
🏷️ Order Status
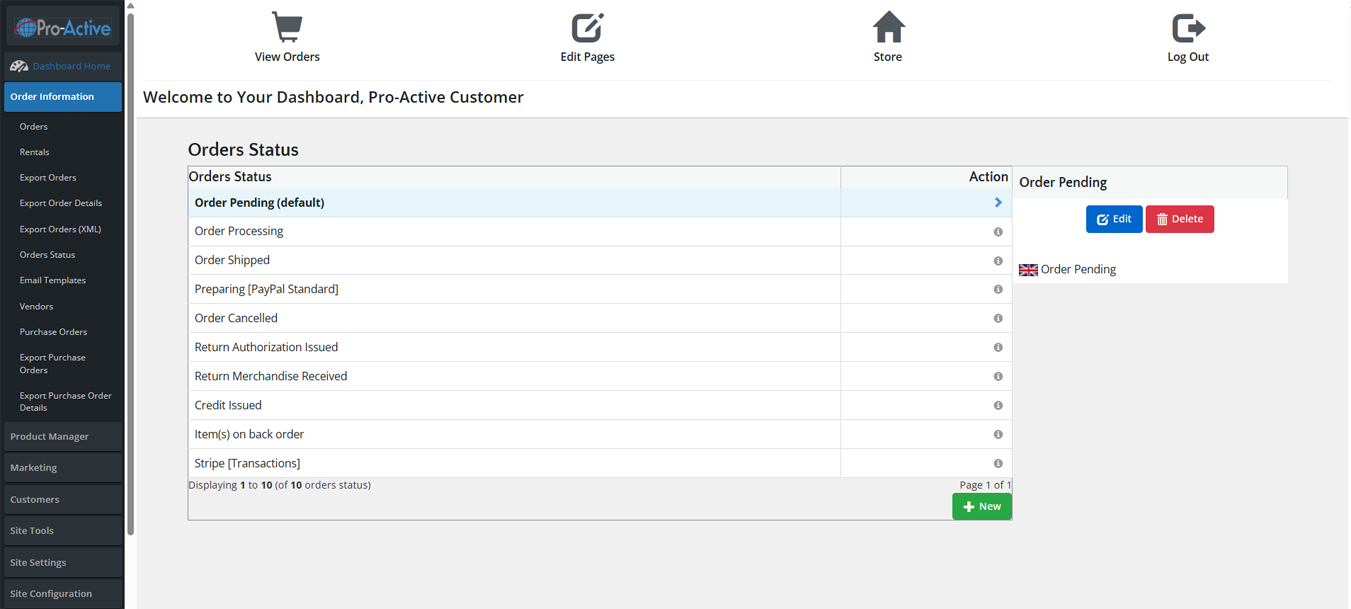
The Order Status page lets you manage the list of available order statuses. Default statuses include: Order Pending, Order Processing, Order Shipped, Preparing [PayPal Standard], Order Cancelled, Return Authorization Issued, Return Merchandise Received, Credit Issued, Item(s) on back order, and Stripe [Transactions].
Adding a New Order Status
Steps to Add a Custom Order Status
- Navigate to Order Information → Order Status.
- Click the green + New button at the bottom right.
- Enter a name for the new status (e.g., "Ready for Pickup").
- The status will appear in the left panel. It is immediately available when updating orders.
Editing or Deleting an Order Status
Steps
- Click a status row in the list. The detail panel appears on the right.
- Click Edit to modify the status name, then save.
- Click Delete to remove it. You cannot delete statuses that are currently assigned to orders.
✉️ Email Templates
Email Templates control the automated emails sent to customers when their order status changes. You can customize the subject line, body text, and include dynamic variables such as the customer's name, order number, and items ordered.
How to Edit an Email Template
- Navigate to Order Information → Email Templates.
- Click the template you want to edit (e.g., "Order Pending" confirmation email).
- The template editor opens on the right. Edit the Subject and Body fields.
- Use available template variables (shown in the editor) to insert dynamic content such as
%customer_name%,%order_id%, and%order_products%. - Click Save to apply changes.
🏢 Vendors
Vendors are the suppliers or fulfillment partners associated with your products and purchase orders. Adding vendors allows you to track which supplier provides each product and create purchase orders directed to them.
How to Add a Vendor
- Navigate to Order Information → Vendors.
- Click the green + New button.
- Fill in the vendor details: Name, Contact Name, Email Address, Phone, Address.
- Click Save. The vendor is now available when creating purchase orders.
📄 Purchase Orders
Purchase Orders (POs) allow you to track incoming inventory from vendors. Create a PO for each supplier order and update it when inventory is received.
Creating a Purchase Order
- Navigate to Order Information → Purchase Orders.
- Click + New.
- Select the Vendor from the dropdown.
- Set the Expected Date for the shipment arrival.
- Add line items: select each product and enter the Quantity Ordered and Unit Cost.
- Add a PO Number and any internal Notes.
- Click Save. When inventory arrives, return to the PO and mark items as received.
📦 Product Manager
Create and manage your entire product catalog: categories, products, cross-sells, manufacturers, reviews, options, imports, and feeds.
- Categories & Products
- Cross Sell Products
- Manufacturers
- Product Reviews
- Products Expected
- Product Options
- Import / Update
- Feeds & GPM Manager
🗂️ Categories & Products
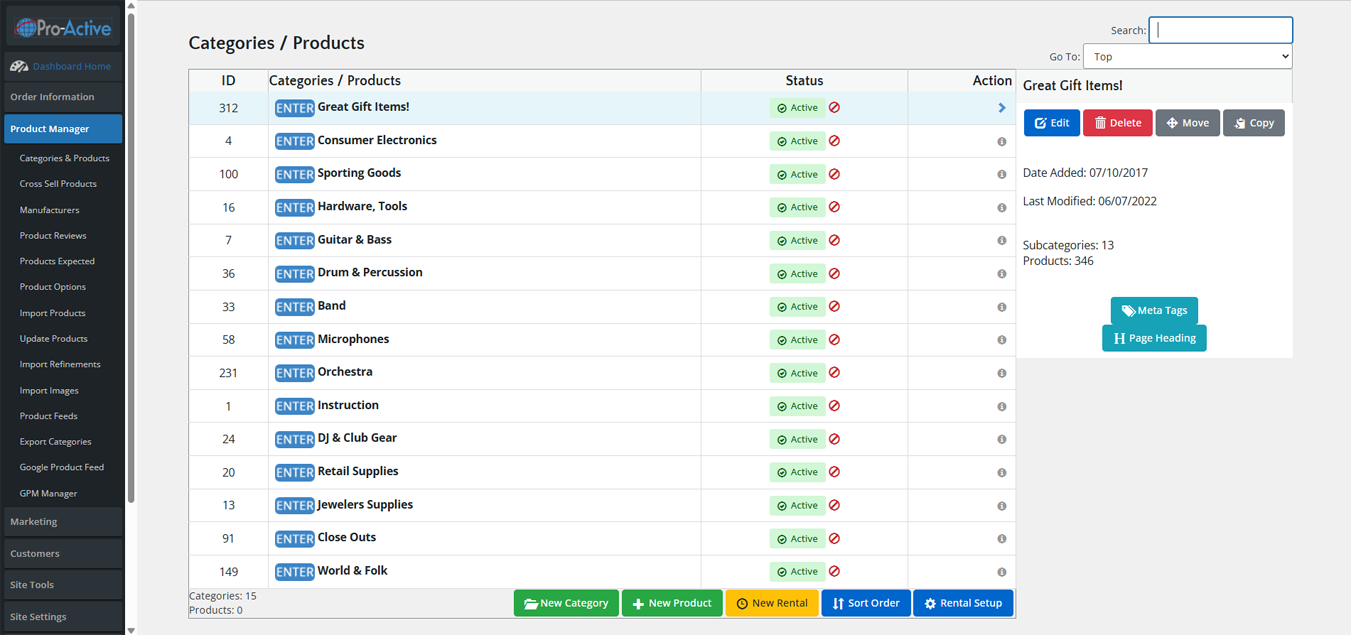
The Categories & Products page is your primary product management interface. It displays a hierarchical list of all top-level categories. Use the ENTER button to drill into a category and see its sub-categories and products.
Interface Overview
| Element | Description |
|---|---|
| ID Column | Unique database ID for the category or product. |
| ENTER Button | Blue button — click to enter a category and see its contents. |
| Categories/Products Name | Name of the category or product. Click a row to see details in the right panel. |
| Status Column | Green Active or Red Inactive. Click the Active/Inactive button to toggle status instantly. |
| Action Column | Arrow (▶) to select; Info (ℹ) to see quick details in the right panel. |
| Right Panel | Shows Edit, Delete, Move, Copy buttons + metadata (Date Added, Last Modified, Subcategories, Products count). |
| Go To Dropdown | Jump directly to any category by name. |
| Search Box | Search products/categories by name. |
Adding a New Category
Steps to Create a Category
- Navigate to Product Manager → Categories & Products.
- If you are adding a top-level category, make sure you are at the top level (use the "Top" breadcrumb).
- If you are adding a sub-category, click ENTER on the parent category first to go inside it.
- Click the green + New Category button (bottom right).
- Fill in the category details (see field table below).
- Click Save.
Category Fields
| Field | Description & Instructions |
|---|---|
| Category Name | The name displayed on the storefront navigation and category pages. Keep it concise and descriptive. |
| Category Description | Optional text describing the category. Displays at the top of the category page on the storefront. Supports HTML formatting. |
| Category Image | Upload an image to represent this category. Recommended size: as specified in Site Configuration → Images → Category Image Size. |
| Sort Order | Controls the display order. Lower numbers appear first (0 = top, 99 = bottom). Leave at 0 to sort alphabetically. |
| Status | Active = visible on storefront. Inactive = hidden from customers but still in the database. |
| Meta Tag Title | SEO: Browser tab title for this category page. If left blank, defaults to the category name. |
| Meta Tag Description | SEO: 155-character description for search engine results snippets. |
| Meta Tag Keywords | SEO: Comma-separated keywords related to this category (less important for modern SEO but still used). |
Adding a New Product
Steps to Add a Product
- Navigate to the category where you want to add the product using the ENTER button.
- Click the green + New Product button.
- Fill in all required product fields (see table below).
- Upload at least one product image using the Product Images section.
- Set the product Status to Active when ready to publish.
- Click Save.
Product Fields — General Tab
| Field | Description & Instructions |
|---|---|
| Product Name | The full product name displayed on the storefront. Be specific and include key attributes (brand, model, size, color). |
| Product Description | Full HTML description of the product. This is the main selling copy — include features, specifications, and benefits. Supports rich text/HTML editor. |
| Product Model | SKU or model number. Used for inventory tracking, exports, and searches. Must be unique per product. |
| Product Price | The retail price customers will pay. Enter as a number (e.g., 29.99). Do not include $ sign. |
| Product Cost | Your cost / wholesale price. For internal use only — not visible to customers. Used for profit margin reporting. |
| Product Weight | Weight in the unit configured in Site Configuration → Shipping. Used to calculate shipping rates. |
| Quantity | Current stock quantity. Used for stock management. Set to 0 to show as out of stock (behavior depends on stock settings). |
| Status | Active = product appears on storefront. Inactive = product hidden from customers. |
| Date Available | If set to a future date, the product will only appear on the storefront from that date forward. Useful for pre-orders. |
| Sort Order | Controls display order within its category. Lower = appears first. |
Product Images
How to Add Product Images
- In the product editor, scroll to the Product Images section.
- Click Browse to select an image from your computer.
- The platform will automatically generate thumbnail and full-size versions based on your Image configuration settings.
- To add more images, click Add Another Image and repeat.
- Use the Sort Order field to control which image appears first.
- The first (or lowest sort order) image becomes the main product image on category and search pages.
Editing an Existing Product
Steps to Edit a Product
- Navigate to the category containing the product, or use the Search box in the top right of the Categories & Products page.
- Click on the product row to select it (the right panel shows its details).
- Click the blue Edit button in the right panel.
- Make your changes in the product editor form.
- Click Save at the bottom of the form. Changes are live immediately.
Moving or Copying a Product/Category
Steps to Move a Product to a Different Category
- Navigate to the product (or category) you want to move.
- Click on it to select it, then click the Move button in the right panel.
- A dialog appears — select the destination category from the dropdown.
- Click Move to confirm. The product is now in the new category only.
🔀 Cross Sell Products
Cross Sells are products recommended to customers on the product detail page. For example, if a customer views a guitar, you might cross-sell guitar strings and a tuner. Cross sells increase average order value.
Setting Up Cross Sells
- Navigate to Product Manager → Cross Sell Products.
- Search for or select the primary product (the product the customer is viewing).
- In the right panel, click Add Cross Sell.
- Search for and select the product(s) you want to recommend.
- Set a Sort Order to control the display sequence of recommendations.
- Click Save. Cross sells appear immediately on the storefront product page.
🏭 Manufacturers
Manufacturers (also called Brands) can be assigned to products to enable brand-based filtering and browsing on the storefront.
Adding a Manufacturer / Brand
- Navigate to Product Manager → Manufacturers.
- Click + New.
- Enter the Manufacturer Name (e.g., "Fender", "Gibson", "Sony").
- Optionally upload a Manufacturer Logo image.
- Enter a URL (the manufacturer's website) if desired.
- Click Save. The manufacturer is now available when editing products.
⭐ Product Reviews
Manage customer-submitted product reviews. You can approve, edit, or delete reviews before they appear on the storefront.
Managing Reviews
- Navigate to Product Manager → Product Reviews.
- The list shows all submitted reviews with: Product Name, Reviewer, Rating (stars), Date, and Status.
- Click a review to select it. The right panel shows the full review text.
- Click Edit to modify the review text or rating.
- Click the Status toggle to set the review as Active (visible) or Inactive (hidden).
- Click Delete to permanently remove the review.
📅 Products Expected
Products Expected lists all products that have a future "Date Available" set, showing when they will become visible on the storefront. This is your pre-order and upcoming product tracking page.
🎛️ Product Options
Product Options allow you to create reusable attribute sets (such as Size, Color, Material) that can be applied to multiple products. When assigned to a product, options create variants the customer selects before adding to cart.
Creating a Product Option Group
- Navigate to Product Manager → Product Options.
- Click + New Option.
- Enter the Option Name (e.g., "Size", "Color", "Finish").
- Select the Option Type: Dropdown, Radio Button, Checkbox, Text, File Upload, or Date.
- For Dropdown/Radio types, add Option Values (e.g., Small, Medium, Large) with optional price modifiers.
- Set whether the option is Required (customer must select before adding to cart).
- Click Save.
Assigning an Option to a Product
- Open the product in the product editor (Product Manager → Categories & Products → Edit).
- Scroll to the Product Options section within the product form.
- Click Add Option and select the option group from the dropdown.
- Configure any product-specific price modifiers for each option value.
- Save the product. The option selector now appears on the storefront product page.
⬆️ Import / Update Products
The platform supports bulk product imports and updates via CSV files, allowing you to manage large catalogs efficiently.
| Tool | URL | Purpose |
|---|---|---|
| Import Products | /storeadmin/products_import.php | Add new products in bulk via CSV file upload. |
| Update Products | /storeadmin/products_update.php | Update existing products (prices, stock, descriptions) via CSV. |
| Import Refinements | /storeadmin/import_refinements.php | Import product refinement/attribute data for filtering. |
| Import Images | /storeadmin/import_images.php | Bulk import product images via ZIP archive or FTP path. |
Importing Products via CSV
- Navigate to Product Manager → Import Products.
- Download the sample CSV template from the import page to see the required column format.
- Prepare your CSV file with the correct column headers: products_model, products_name, products_description, products_price, products_weight, products_quantity, categories_id, manufacturers_id, products_status.
- Click Browse and select your CSV file.
- Select whether to update existing products (match by model number) or skip duplicates.
- Click Import. The system processes the file and reports success/error counts.
- Review the import log for any errors and correct your CSV file if needed.
📡 Product Feeds & GPM Manager
| Tool | URL | Purpose |
|---|---|---|
| Product Feeds | /storeadmin/product_feeds.php | Generate data feeds for shopping comparison sites (Shopzilla, PriceGrabber, etc.). |
| Export Categories | /storeadmin/categories_export.php | Export your category structure as CSV. |
| Google Product Feed | /storeadmin/google_feed.php | Generate a Google Merchant Center-compatible product feed (XML/TXT). |
| GPM Manager | /storeadmin/gpm_manager.php | Google Product Manager — schedule and automate Google Shopping feed updates. |
📣 Marketing
Drive sales with affiliate programs, promotional pricing, and customer newsletters.
🤝 Affiliate Codes
Affiliate Codes are unique discount or tracking codes assigned to affiliates (referral partners, influencers, sales reps). When a customer uses a code at checkout, the purchase is credited to that affiliate.
Creating an Affiliate Code
- Navigate to Marketing → Affiliate Codes.
- Click + New.
- Enter a unique Code (e.g., "SARAH20" or "PARTNER-001"). Codes are case-insensitive.
- Select the affiliated Organization (if applicable — see Affiliate Organizations below).
- Set the Discount Type: Percentage off or Fixed dollar amount.
- Enter the Discount Value (e.g., 20 for 20% off, or 10 for $10 off).
- Set optional Start Date and End Date if the code has a limited validity period.
- Set a Usage Limit if the code can only be used a limited number of times.
- Set Status to Active.
- Click Save. Share the code with your affiliate partner.
🏢 Affiliate Organizations
Affiliate Organizations are groups or companies that manage multiple affiliate codes. For example, a marketing agency might be one organization with several individual affiliates (codes) under it.
Creating an Affiliate Organization
- Navigate to Marketing → Affiliate Organizations.
- Click + New.
- Enter the Organization Name.
- Enter contact information (email, phone).
- Click Save. You can now assign this organization to Affiliate Codes.
🏷️ Specials
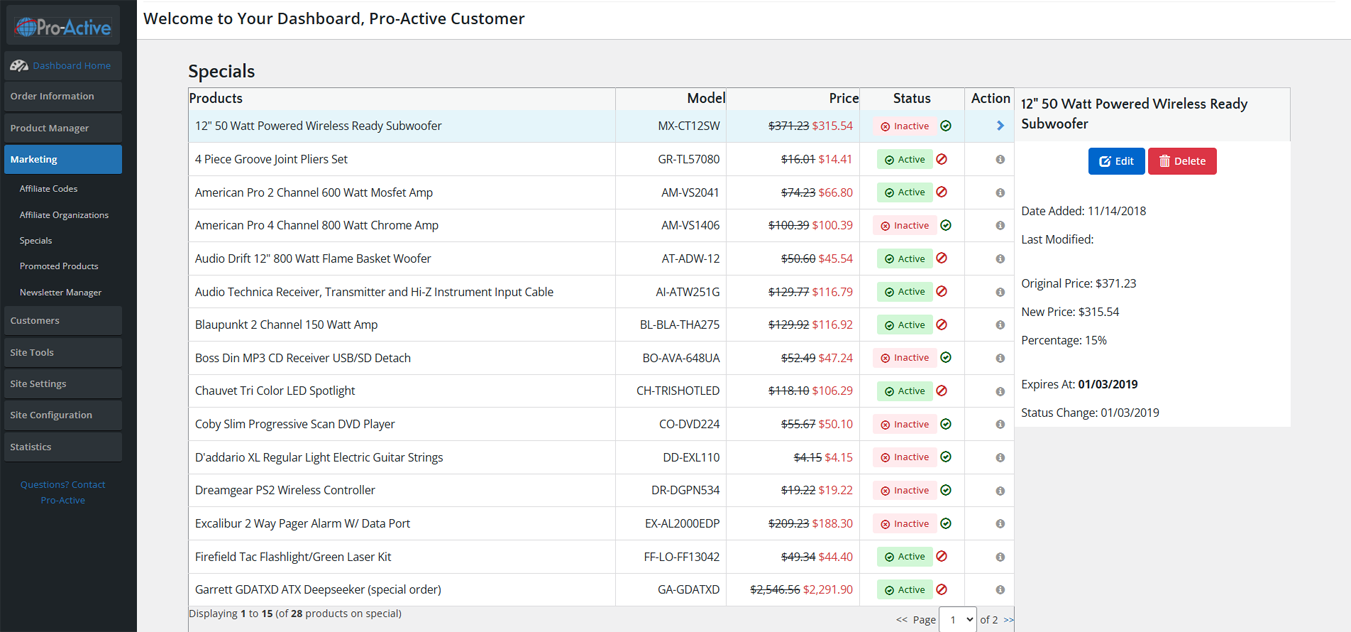
Specials set sale prices on specific products. When a special is active, the product shows the original price with a strikethrough and the discounted price in a different color on the storefront.
Specials List
| Column | Description |
|---|---|
| Products | Product name — click to select and view/edit in right panel. |
| Model | Product SKU/model number for reference. |
| Price | Shows original price (strikethrough) and the special/sale price. |
| Status | Active (green) or Inactive (red). Toggle by clicking the status icon. |
| Action | Arrow (▶) to select; gear icon (ℹ) for quick info panel. |
Adding a Special / Sale Price
- Navigate to Marketing → Specials.
- Click + New Special.
- Search for the product by name or model number in the Product search field.
- Enter the Special Price (the discounted price, not the discount amount).
- Alternatively, enter a Percentage Discount (e.g., 15 for 15% off) and the system calculates the sale price.
- Set an optional Expires At date for limited-time sales.
- Set Status to Active.
- Click Save. The sale price appears immediately on the storefront.
⭐ Promoted Products
Promoted Products are featured products displayed in special sections of your storefront (e.g., homepage featured section, sidebar "Featured" widget). This is separate from specials — promoted products are highlighted on the site without necessarily having a discount.
Adding a Promoted Product
- Navigate to Marketing → Promoted Products.
- Click + New.
- Search for and select the Product you want to promote.
- Set a Sort Order to control where it appears relative to other promoted products.
- Set an optional Expiry Date if you only want it promoted for a limited time.
- Set Status to Active and click Save.
📧 Newsletter Manager
The Newsletter Manager allows you to create and send email newsletters to your customer subscriber list. Customers opt in on the storefront or during account creation.
Sending a Newsletter
- Navigate to Marketing → Newsletter Manager.
- Click + New Newsletter.
- Enter a Title (internal reference name for the newsletter).
- Enter the Email Subject (what subscribers see in their inbox).
- Compose the Newsletter Content using the rich text editor. You can use HTML for advanced formatting.
- To preview the newsletter, click the Preview button.
- To send a test email to yourself, click Send Test and enter your email address.
- When ready to send to all subscribers, click Send Newsletter and confirm the action.
👥 Customers
View and manage customer accounts, communicate with your customer base, see live shopping activity, and manage recurring billing.
👤 Customer Accounts
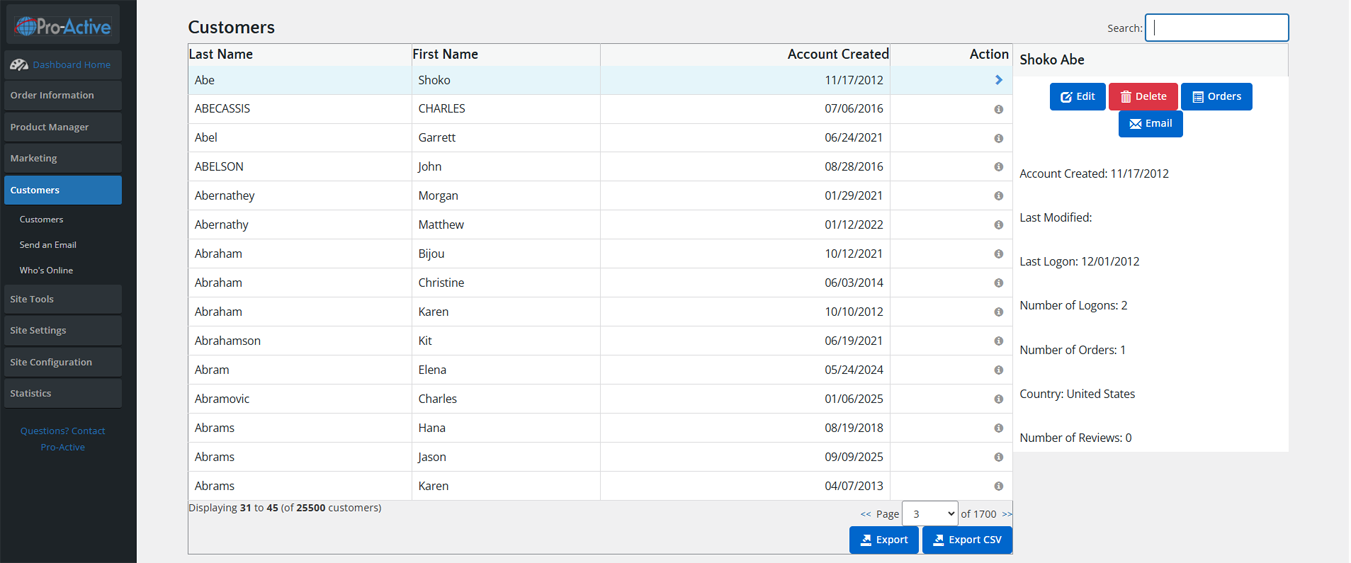
The Customers page lists all registered customer accounts. Each row shows Last Name, First Name, and Account Created date. Click a row to see detailed account information in the right panel.
Customer List Features
| Feature | Description |
|---|---|
| Search Box | Search customers by last name, first name, or email address. |
| Export Button | Export the full customer list as a file for use in email marketing platforms (Mailchimp, Constant Contact, etc.). |
| Export CSV Button | Export in CSV format specifically, compatible with spreadsheet and CRM tools. |
| Right Panel Info | Shows Account Created date, Last Modified, Last Logon date, Number of Logons, Number of Orders, Country, Number of Reviews, and default address. |
Actions on a Selected Customer
| Button | Action |
|---|---|
| Edit | Opens the full customer account editor. Change name, email, address, newsletter opt-in, password, and customer group. |
| Delete | Permanently deletes the customer account. The customer's order history is preserved but no longer linked to an active account. |
| Orders | View all orders placed by this customer in a filtered order list. |
| Opens the Send Email form pre-populated with this customer's email address. |
Editing a Customer Account
Steps to Edit Customer Information
- Click the customer row to select them, then click the Edit button.
- The Customer Edit form opens. Fields include: Gender, First/Last Name, Date of Birth, Email Address, Newsletter subscription (Yes/No), Company Name, Customer Group (for wholesale/tiered pricing).
- Address information can be added or modified in the Address Book section.
- To reset a customer's password: scroll to the Password field, enter a new temporary password, and notify the customer. Advise them to change it after logging in.
- Click Save to apply changes.
✉️ Send an Email
The Send an Email tool allows administrators to send a custom email to individual customers, customer groups, or all subscribers directly from the admin panel.
How to Send a Customer Email
- Navigate to Customers → Send an Email.
- Select the Send To target: Individual Customer, Customer Group, or All Newsletter Subscribers.
- If sending to an individual, search for and select the customer.
- Enter the Subject line.
- Compose the email Message in the text editor. Basic HTML is supported for formatting.
- Click Send Email. The email sends immediately from your store's configured email address.
🟢 Who's Online
Who's Online shows you a real-time list of visitors currently browsing your store. This includes both registered customers (shown by name if logged in) and anonymous visitors (shown by IP address).
| Column | Description |
|---|---|
| Customer Name | "Guest" for anonymous visitors, or the customer's name if logged in. |
| IP Address | The visitor's IP address. Useful for identifying geographic location of shoppers. |
| Session Time | How long the visitor has been on the site in the current session. |
| Last Click | The last page URL the visitor viewed, updated in real time. |
| Last Action | Timestamp of their most recent page request. |
💳 Auto Billing
Auto Billing manages recurring payment subscriptions for customers. If your store offers subscription products or memberships, this tool tracks billing cycles, processes recurring charges, and shows billing history.
Managing Auto Billing Accounts
- Navigate to Customers → Auto Billing.
- The list shows all active recurring billing accounts with customer name, billing amount, frequency, next billing date, and status.
- Click a row to select it. The right panel shows billing history and account details.
- Click Edit to modify billing amount, frequency, or next billing date.
- Click Cancel to stop recurring billing for that customer account.
🔧 Site Tools
Manage informational pages on your storefront and handle eBay product export settings.
📄 Add / Edit Information Pages
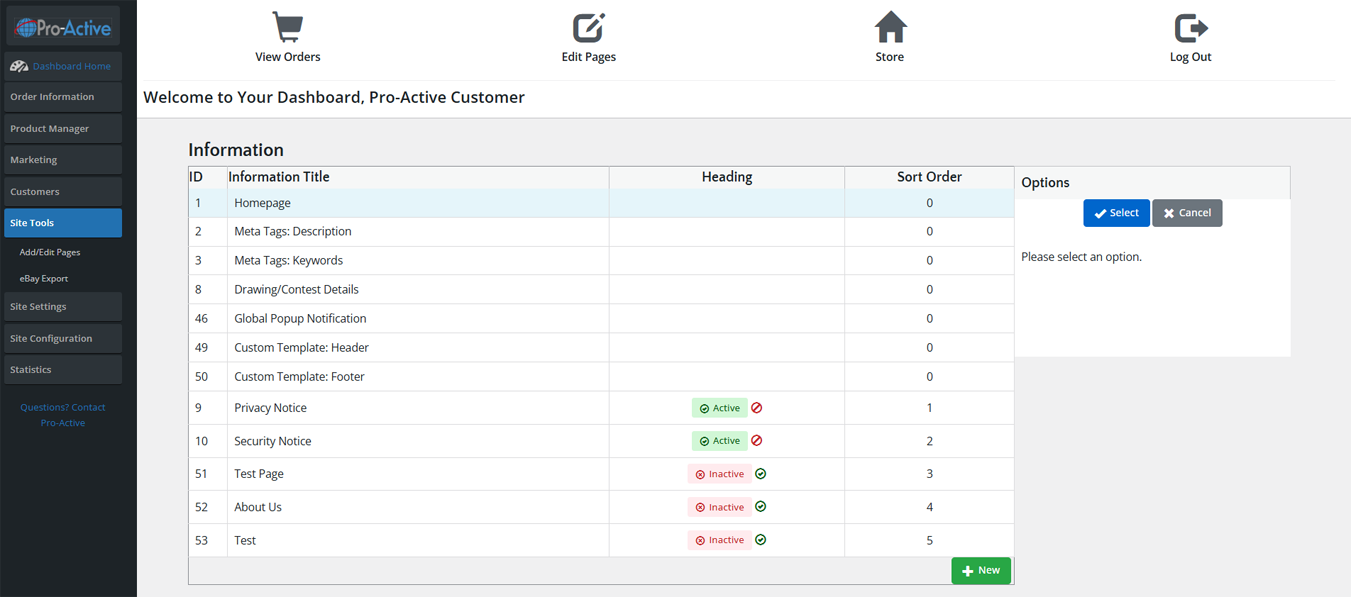
Information Pages are the content pages of your storefront that are not product pages — things like the Privacy Policy, About Us, Security Notice, and custom landing pages. The platform comes with several pre-configured system pages.
Information Pages List
| Column | Description |
|---|---|
| ID | Unique page ID number. |
| Information Title | Internal name / page title. |
| Heading | Whether this page appears as a menu item with an Active/Inactive status toggle. |
| Sort Order | Controls the display order in the storefront navigation menu. |
System Pages (Non-deletable)
| Page Name | Purpose |
|---|---|
| Homepage | Contains the homepage meta description and SEO content. |
| Meta Tags: Description | Global site meta description used on pages without their own meta. |
| Meta Tags: Keywords | Global site meta keywords (legacy SEO). |
| Drawing/Contest Details | Content for your contest/drawing page if that feature is enabled. |
| Global Popup Notification | Content of a popup modal that can be displayed site-wide (e.g., COVID notice, sale announcement). |
| Custom Template: Header | Custom HTML injected into the header of every storefront page. |
| Custom Template: Footer | Custom HTML injected into the footer of every storefront page. |
| Privacy Notice | Your store's privacy policy — displayed in the storefront footer navigation. |
| Security Notice | Your store's security/SSL policy — displayed in storefront footer. |
Adding a New Information Page
Steps to Create a Custom Page
- Navigate to Site Tools → Add/Edit Pages.
- Click the green + New button at the bottom right.
- Enter the Information Title — this is the page title displayed at the top of the page and in the browser tab.
- Enter the page Content using the rich text editor. You can write in the visual editor or switch to HTML source mode for more control.
- Set the Sort Order if this page will appear in the navigation menu.
- Toggle Show in Navigation to Active if you want this page linked in the storefront footer or menu.
- Click Save. The page is live immediately.
Editing an Existing Page
Steps to Edit Page Content
- Click the page row in the list to select it.
- In the right panel, click the blue Edit button (or just double-click the page row).
- The content editor opens. Make your changes.
- Click Save. Changes appear on the storefront immediately.
🛍️ eBay Export
The eBay Export tool allows you to export your product catalog in a format compatible with eBay bulk listing tools (Turbo Lister / File Exchange). This enables you to list your store's products on eBay from a single data export.
How to Export Products for eBay
- Navigate to Site Tools → eBay Export.
- Select the Category or categories you want to export (or select All).
- Configure eBay-specific settings: listing duration, payment methods accepted, shipping profile.
- Click Export. A CSV/Tab-delimited file is generated and downloaded.
- Import the downloaded file into eBay's Seller Hub or File Exchange tool.
⚙️ Site Settings
Control the visual appearance, modules, and regional settings of your storefront — from templates and colors to shipping, payment, and tax.
- Templates
- Layout Colors
- Logos
- Menu
- Slideshow
- Social Links
- Homepage Modules
- Shipping Modules
- Payment Modules
- Order Total Modules
- Tax Rates, Zones & Classes
- Countries, Zones & Currencies
🎨 Templates
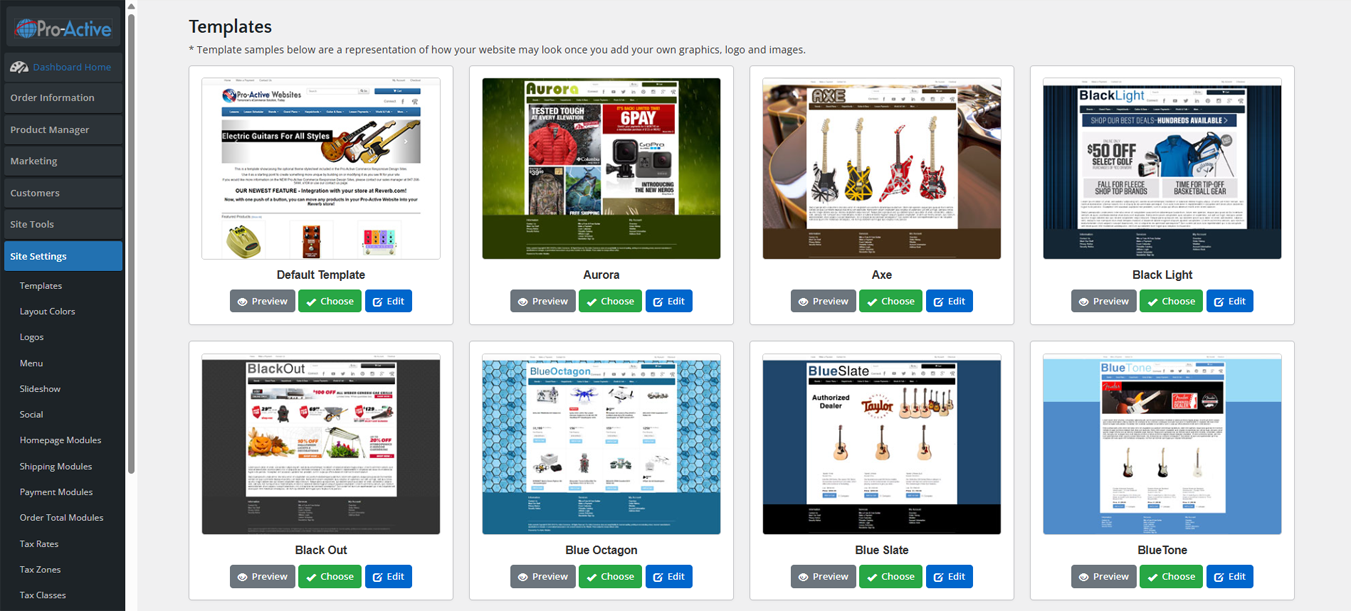
The Templates page displays all available storefront design templates. Each template is shown as a thumbnail preview with your real store content. You can preview any template on your live site before activating it.
Changing Your Storefront Template
- Navigate to Site Settings → Templates.
- Browse the available templates. Each has three buttons: Preview, Choose, and Edit.
- Click Preview to open a live preview of that template with your store's actual products and branding — without making it live.
- When you find the template you want, click Choose to activate it. Your storefront immediately switches to this template.
- Click Edit to customize template-specific CSS or layout files (advanced — requires web design knowledge).
🖌️ Layout Colors
Layout Colors lets you customize the color scheme of your active template — primary colors, accent colors, button colors, link colors, and background colors — without editing any CSS code.
Changing Your Store's Color Scheme
- Navigate to Site Settings → Layout Colors.
- The form shows color swatches and hex codes for each color element (Header Background, Navigation Color, Button Color, Link Color, etc.).
- Click a color swatch to open the color picker, or type a hex code directly (e.g., #FF5500 for orange).
- Click Save. The color changes apply immediately to the storefront.
- Open your storefront in another browser tab to verify the changes look correct.
🖼️ Logos
Upload and manage the logos and header images displayed on your storefront.
Uploading Your Store Logo
- Navigate to Site Settings → Logos.
- Click Browse next to the logo field (main logo, favicon, etc.).
- Select your logo file from your computer. Accepted formats: JPG, PNG, GIF. For best results use PNG with a transparent background.
- Recommended logo dimensions are shown on the page — follow these for the best visual result with your active template.
- Click Upload to save the logo. It appears on the storefront immediately.
☰ Menu
The Menu manager controls the navigation links displayed in your storefront's header and/or sidebar navigation menus.
Adding or Editing Menu Items
- Navigate to Site Settings → Menu.
- The current menu structure is displayed. Each item has a Sort Order, Label, and URL.
- To add a new menu item: click + New. Enter the Link Text (label), URL (destination), and Sort Order.
- For sub-menu items (dropdowns), select the Parent Menu item when creating the new item.
- To edit: click the item and click Edit in the right panel.
- To remove: click the item and click Delete. Menu items that are category links are managed via Categories & Products.
- Click Save after making changes.
🖼️ Slideshow
Manages the image slideshow/carousel that appears on your homepage (if enabled in your template). Each slide can include an image, a caption, and a clickable link.
Adding a Slideshow Image
- Navigate to Site Settings → Slideshow.
- Click + New Slide.
- Upload your slide image. Check the recommended dimensions for your template (usually 1200×450px or 1920×700px depending on the template).
- Enter an optional Caption / Alt Text (also important for SEO and accessibility).
- Enter the Link URL — where customers go when they click the slide (e.g., a category page or special offer).
- Set the Sort Order to control slide sequence.
- Set Status to Active.
- Click Save.
📱 Social Links
Configure the social media links displayed in your storefront footer or header (Facebook, Instagram, Twitter/X, YouTube, Pinterest, etc.).
Setting Up Social Media Links
- Navigate to Site Settings → Social.
- For each social platform, enter your full profile URL (e.g., https://www.facebook.com/yourpagename).
- Toggle each platform to Active to display its icon on the storefront.
- Click Save. Icons appear in the storefront footer with links to your profiles.
🏠 Homepage Modules
Homepage Modules are content blocks displayed on your storefront homepage — Featured Products, New Products, Specials, Customer Testimonials, etc. Enable, disable, and reorder them here.
Managing Homepage Modules
- Navigate to Site Settings → Homepage Modules.
- Each module shows its name and Sort Order. Sort Order controls where on the homepage it appears (lower = higher on page).
- Click a module to select it. Click Install Module to activate a module that isn't currently installed, or Remove to deactivate it.
- Click Edit on an installed module to configure it (e.g., set how many featured products to show).
🚚 Shipping Modules
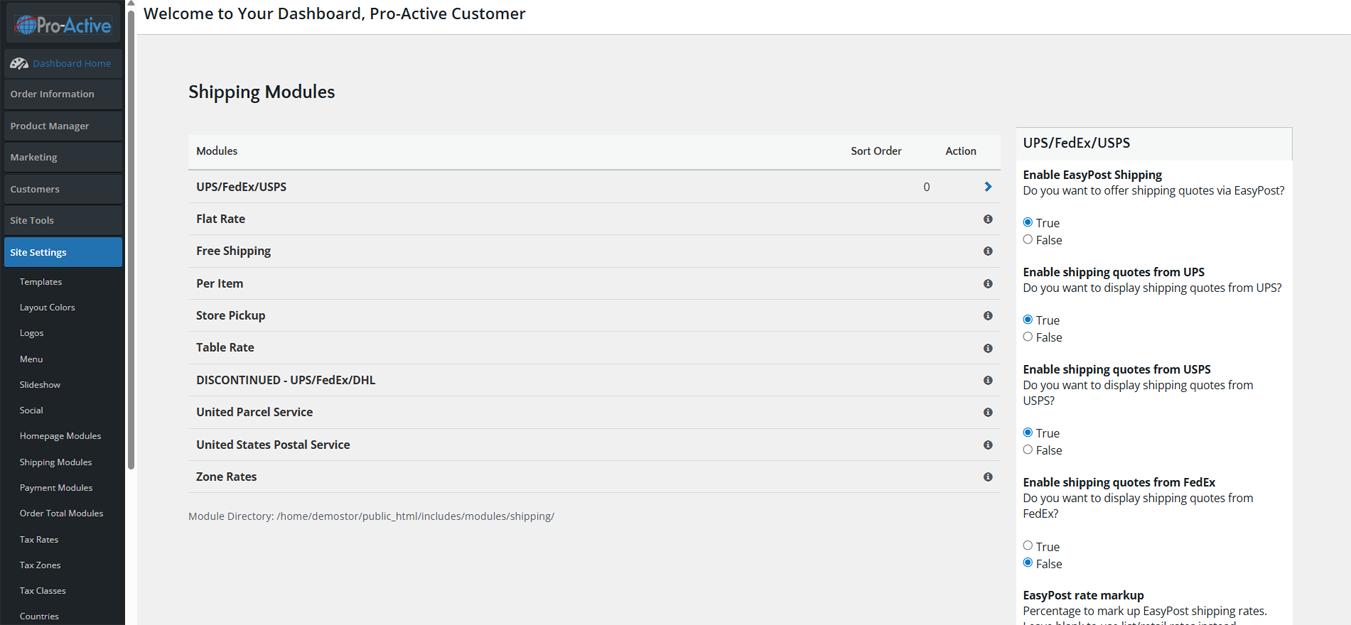
Shipping Modules control how shipping rates are calculated and presented to customers at checkout. Available modules include:
| Module | Description |
|---|---|
| UPS/FedEx/USPS | Live carrier rate lookup via EasyPost API. Shows real-time shipping quotes from UPS, FedEx, and USPS. No EasyPost account required to get rates (EasyPost account offers discounted rates). |
| Flat Rate | Charges a single fixed shipping fee for all orders (e.g., $5.99 standard shipping). |
| Free Shipping | Offers free shipping, optionally above a minimum order amount. |
| Per Item | Charges a fixed rate per item in the order (e.g., $1.50 per item). |
| Store Pickup | Allows customers to select local pickup at your physical location. No shipping charge. |
| Table Rate | Custom shipping rates based on order weight or order total brackets you define. |
| Zone Rates | Different shipping rates for different geographic zones (states, regions, countries). |
Installing and Configuring a Shipping Module
- Navigate to Site Settings → Shipping Modules.
- Click a shipping module row to select it.
- If not yet installed, click Install Module in the right panel to activate it.
- Once installed, click Edit to configure module settings (e.g., for Flat Rate: enter the flat fee amount; for UPS/FedEx/USPS: enter your EasyPost API key if using discounted rates).
- Set the Sort Order — this controls the order shipping options appear to customers at checkout.
- To remove a module from checkout, click Remove.
💳 Payment Modules
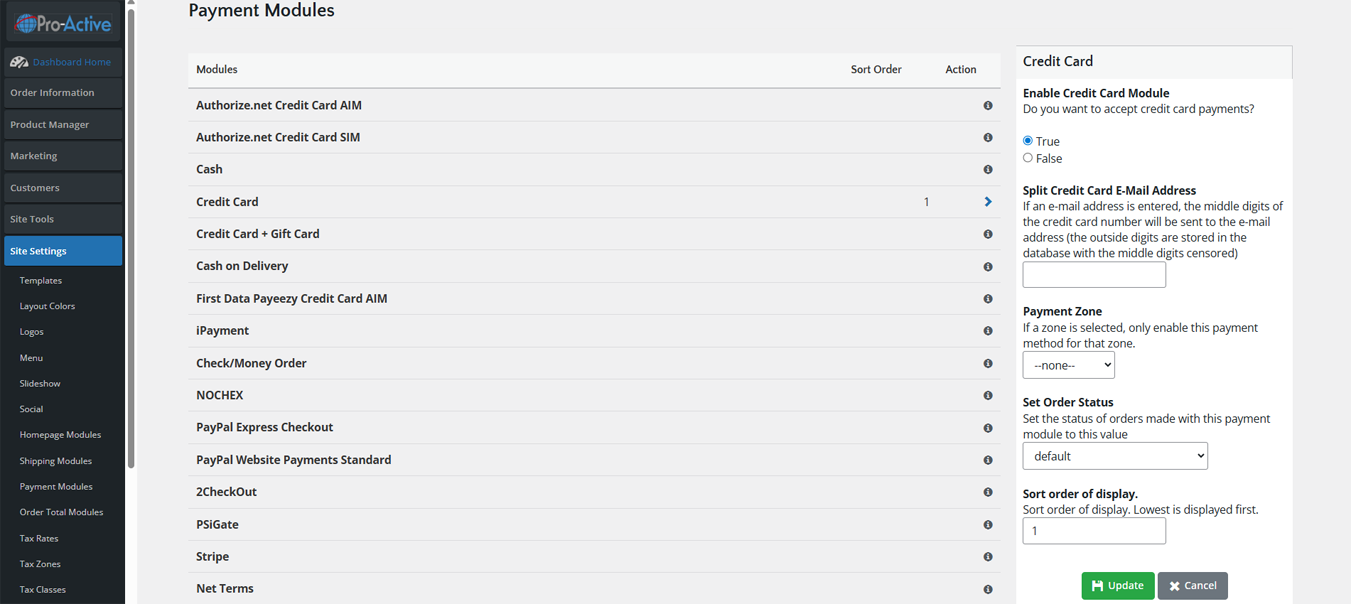
Payment Modules control the checkout payment options available to customers. Each module represents a different payment gateway or payment method.
| Module | Description |
|---|---|
| Authorize.net Credit Card AIM | Direct Authorize.net AIM API integration for credit card processing on your site. |
| Authorize.net Credit Card SIM | Authorize.net SIM (hosted payment page) integration — redirects to Authorize.net for payment. |
| Cash | Allows "cash payment" orders — used for phone/manual orders where payment is taken offline. |
| Credit Card | Generic credit card module — collects card details directly on your site (requires SSL and PCI compliance). |
| Credit Card + Gift Card | Allows customers to pay with a combination of credit card and gift card balance. |
| Cash on Delivery | COD orders — customer pays upon delivery. |
| Check/Money Order | For customers who prefer to mail a check or money order. |
| iPayment | iPayment gateway integration for credit card processing. |
| NOCHEX | NOCHEX UK payment gateway. |
| PayPal Express Checkout | PayPal's express checkout button — customers pay via their PayPal account or credit card through PayPal. |
Installing a Payment Module
- Navigate to Site Settings → Payment Modules.
- Click the payment module you want to activate.
- Click Install Module in the right panel.
- Click Edit to configure the module settings (API keys, account IDs, test mode toggle, etc.).
- Set Sort Order to control where this option appears in the checkout payment selection list.
- To test: place a test order on the storefront using the module's test/sandbox credentials.
🧮 Order Total Modules
Order Total Modules calculate and display the various line items in the checkout order summary — subtotal, shipping, tax, discount codes, gift certificates, and grand total.
| Module | Description |
|---|---|
| Sub-Total | Shows the product subtotal before shipping and tax. Always enabled. |
| Shipping | Displays the calculated shipping charge. Required if you charge for shipping. |
| Tax | Displays the calculated tax amount based on your tax configuration. |
| Discount Coupon | Shows the applied affiliate/coupon code discount in the order total. |
| Gift Certificate | Shows applied gift certificate balance deduction. |
| Total | Grand total line. Always enabled. |
🧾 Tax Configuration
The platform has a three-part tax system: Tax Rates, Tax Zones, and Tax Classes. These work together to apply the correct tax to the correct customers and products.
| Component | URL | Purpose |
|---|---|---|
| Tax Rates | /storeadmin/tax_rates.php | Define percentage rates (e.g., Indiana Sales Tax = 7.0%). Link each rate to a Tax Zone and Tax Class. |
| Tax Zones | /storeadmin/tax_zones.php | Define geographic areas where tax applies (e.g., "Indiana", "All US States", "Europe"). Each zone can include specific countries, states/provinces, or zip codes. |
| Tax Classes | /storeadmin/tax_classes.php | Group products by tax category (e.g., "Taxable Goods", "Exempt Items"). Assign a Tax Class to each product. |
Setting Up Sales Tax (Example: Indiana 7%)
- Go to Tax Zones → create a zone named "Indiana" and add Indiana (US state) to it.
- Go to Tax Classes → create a class named "Taxable Goods".
- Go to Tax Rates → click + New. Set Description to "Indiana Sales Tax", Rate to 7.0%, link to Tax Zone "Indiana" and Tax Class "Taxable Goods".
- Save. Now go to products and set their Tax Class to "Taxable Goods". Indiana customers will automatically be charged 7% tax at checkout.
🌍 Countries, Zones & Currencies
| Section | URL | Purpose |
|---|---|---|
| Countries | /storeadmin/countries.php | Enable/disable which countries customers can ship to. All countries are pre-loaded; simply toggle each on or off. |
| Zones | /storeadmin/zones.php | State/province lists for each country. Used in shipping and tax zone configuration. |
| Currencies | /storeadmin/currencies.php | Enable multiple currencies for international customers. Set exchange rates manually or use automatic rate updates. |
🔩 Site Configuration
Configure all global store settings including store identity, limits, image sizes, customer settings, shipping rules, and advanced integrations.
- My Store
- Min/Max Values
- Images
- Customer Details
- Shipping/Packaging
- Product Listing
- Stock
- Advanced Settings
🏪 My Store
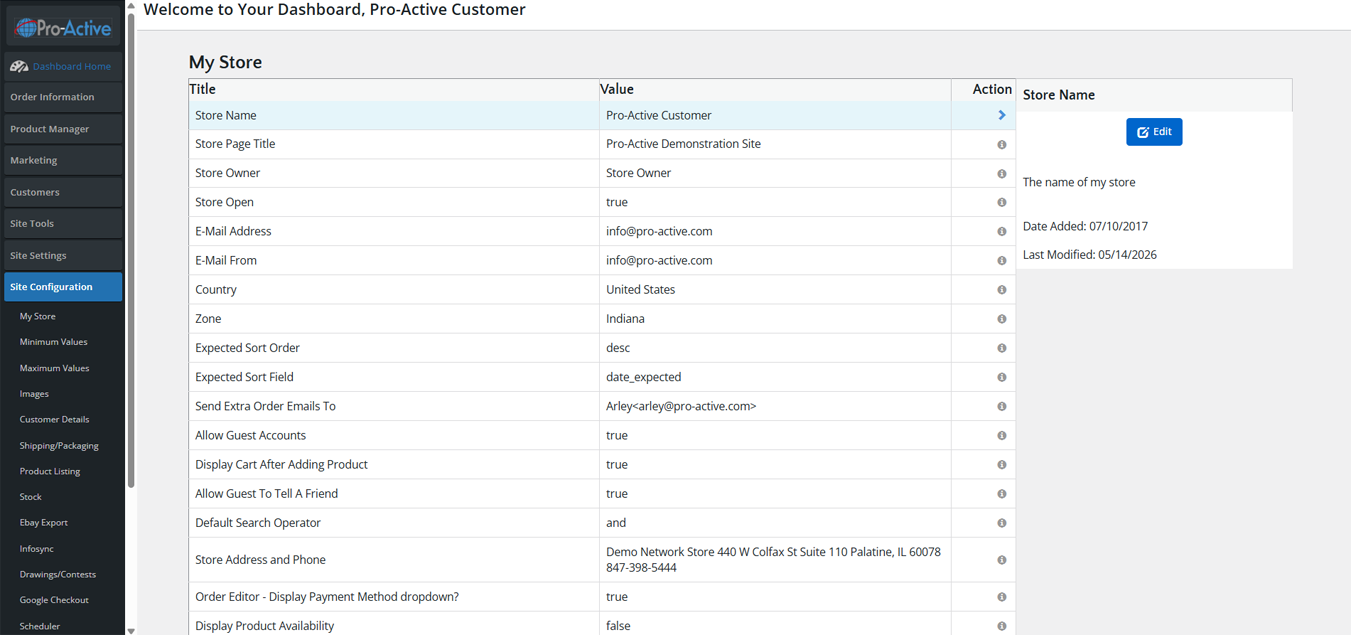
My Store contains the core identity and operational settings for your store. Each setting can be edited by clicking the row and then clicking Edit in the right panel.
| Setting | Description & Recommended Value |
|---|---|
| Store Name | Your store's name as it appears in email subjects and the browser title bar. Keep it concise (e.g., "Pro-Active Music Store"). |
| Store Page Title | The HTML page title for the storefront homepage. Shown in search engine results. Include your primary keyword (e.g., "Pro-Active Music — Guitars, Amps & Accessories"). |
| Store Owner | The name shown as "From" in system emails to customers. |
| Store Open | True/False. Set to False to display a "Store Closed" message to customers while you perform maintenance. Admin panel remains accessible. |
| E-Mail Address | The email address where customer inquiries and order notifications are sent to you. |
| E-Mail From | The "From" email address shown to customers when they receive system emails. Should match your domain (e.g., orders@yourdomain.com). |
| Country | Your store's home country — used as default in address forms and shipping calculations. |
| Zone | Your store's home state/province — used for tax nexus determination. |
| Expected Sort Order | How Products Expected items are sorted: desc (newest expected first) or asc (soonest expected first). |
| Send Extra Order Emails To | Additional email addresses (comma-separated) that receive a copy of every new order notification. Format: "Name<email@domain.com>" |
| Allow Guest Accounts | True = customers can checkout without creating an account. False = account creation required. Recommended: True for higher conversion rates. |
| Display Cart After Adding Product | True = cart page shown immediately after adding item. False = customer stays on product page. Recommended: True. |
| Allow Guest To Tell A Friend | True/False — enables the "Tell a Friend" sharing feature for guest visitors. |
📏 Minimum & Maximum Values
| Section | URL | Controls |
|---|---|---|
| Minimum Values | /storeadmin/configuration.php?gID=2 | Minimum characters for customer fields: First Name, Last Name, Date of Birth, Email Address, Street Address, City, Phone, Password, Credit Card CVV, etc. |
| Maximum Values | /storeadmin/configuration.php?gID=3 | Maximum characters for fields AND pagination limits: products per page in admin, address book entries per customer, order history per page, items in cart, etc. |
How to Edit a Min/Max Value
- Navigate to Site Configuration → Minimum Values (or Maximum Values).
- Click the setting you want to change.
- Click Edit in the right panel.
- Enter the new value in the Value field.
- Click Save.
🖼️ Images
Controls the automatic image resizing dimensions for all product and category images when uploaded through the admin panel.
| Setting | Description |
|---|---|
| Small Image Width / Height | Thumbnail size used in category listings and search results. Recommended: 240×240px. |
| Medium Image Width / Height | Product detail page main image size. Recommended: 640×640px. |
| Large Image Width / Height | Full-size zoom image. Recommended: 1200×1200px or 0×0 to preserve original size. |
| Category Image Width / Height | Category page header image dimensions. Set to match your template's category image area. |
| Calculate Image Size | True = platform uses image width/height tags in HTML for layout. Recommended: True. |
👤 Customer Details
Controls what information is collected from customers during account creation and checkout.
| Setting | Options & Description |
|---|---|
| Gender | True/False — collect customer gender during registration. |
| Date of Birth | True/False — collect birth date (useful for age-restricted products or birthday promotions). |
| Company Name | True/False — include company name field in address forms. |
| Suburb / State | True/False — include suburb or state fields in addresses. |
| Fax Number | True/False — show fax number field in address forms (rarely needed in modern ecommerce). |
| Newsletter checkbox | Default True/False — pre-set state of newsletter opt-in checkbox during checkout. |
📦 Shipping & Packaging
| Setting | Description |
|---|---|
| Country of Origin | Your shipping origin country — used for carrier rate calculations. |
| Postal Code | Your warehouse/store postal code — required for real-time carrier rates (UPS/FedEx/USPS). |
| Weight Unit | lbs or kgs — must match the weight values entered on your products. |
| Tare Weight | Additional packaging weight added to each product's listed weight for shipping calculation. |
| Larger Boxes | True/False — allow the system to suggest larger boxes for multi-item orders. |
📋 Product Listing
Controls how products are displayed on category and search result pages in the storefront.
| Setting | Description |
|---|---|
| Products per Row | How many product tiles display per row in grid view (typically 2, 3, or 4). |
| Products per Page | How many products show per page before pagination kicks in. |
| Show Sort Order | True/False — show the product sort dropdown on category pages. |
| Default Sort Order | Default sorting: by name, price, model, or date added. |
| Show Product Count | True/False — show the number of products in each category in the navigation menu. |
📊 Stock
| Setting | Options & Description |
|---|---|
| Check Stock Level | True = system prevents customers from adding more items than available in stock. False = allow unlimited quantity regardless of stock. |
| Subtract Stock | True = deduct stock quantity from inventory when an order is placed. False = stock levels remain unchanged after orders. |
| Allow Checkout when Out of Stock | True = customers can still order out-of-stock items (backorder). False = items are removed from cart if out of stock. |
| Stock Re-Order Notification | True/False — send an email notification when product stock falls below the re-order level. |
| Stock Re-Order Level | The quantity threshold that triggers a low-stock notification (e.g., 5 = notify when stock reaches 5 units). |
🛠️ Advanced Configuration Settings
| Section | URL | Purpose |
|---|---|---|
| eBay Export Config | /storeadmin/configuration.php?gID=10 | Configure eBay export defaults: Listing Type, Duration, Condition, PayPal email for eBay payments. |
| Infosync | /storeadmin/configuration.php?gID=11 | Settings for data sync integrations with third-party systems. |
| Drawings/Contests | /storeadmin/configuration.php?gID=12 | Configure contest/drawing settings: eligible products, entry rules, and drawing frequency. |
| Scheduler | /storeadmin/scheduler.php | Set up automated tasks (cron jobs) to run at scheduled intervals: feed updates, email campaigns, etc. |
| Auto Billing Config | /storeadmin/configuration.php?gID=14 | Settings for recurring billing: payment method, retry attempts on failure, notification emails. |
| Staff Bios | /storeadmin/staff_bios.php | Create staff profile pages displayed on the storefront "Meet Our Team" or staff directory pages. |
📈 Statistics
Analyze store performance with detailed reports on product popularity, sales data, customer behavior, cart abandonment, and a full audit trail.
- Products Viewed
- Products Purchased
- Customer Orders (Total)
- Unsold Carts
- Conversion Rates
- Order Statistics
- Audit Trail
👁️ Products Viewed
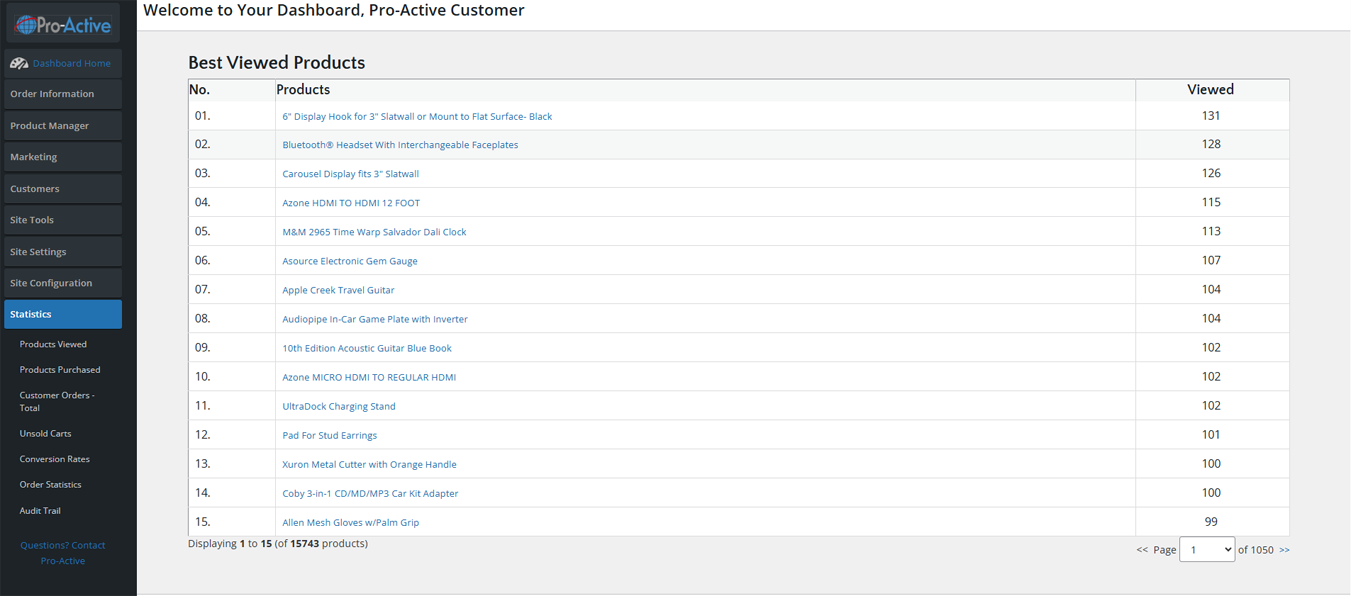
Shows a ranked list of all products by total page view count. This is the same data shown on the Dashboard but paginated with all 15,000+ products available to browse.
| Column | Description |
|---|---|
| No. | Rank from most to least viewed. |
| Products | Clickable product name. |
| Viewed | Total cumulative view count since the stat was first tracked. |
💰 Products Purchased
Shows all products ranked by total units sold. Use this report to identify your best-sellers and ensure you maintain adequate inventory levels for high-performing products.
| Column | Description |
|---|---|
| No. | Rank from most to least purchased. |
| Products | Product name with clickable link. |
| Purchased | Total units sold across all orders. |
📊 Customer Orders (Total)
Shows a ranked list of customers by total lifetime order spend. Useful for identifying your most valuable customers for loyalty programs or special treatment.
| Column | Description |
|---|---|
| Customers | Customer name (first and last). |
| Number of Orders | Total orders placed by this customer. |
| Order Total | Cumulative dollar amount spent across all orders. |
🛒 Unsold Carts
Shows shopping carts that were created but never completed (abandoned carts). For each abandoned cart you can see the customer, the items they had, and the total value. This is critical data for cart abandonment recovery.
Using Unsold Cart Data for Recovery
- Navigate to Statistics → Unsold Carts.
- Review the list — identify customers with high-value abandoned carts.
- For logged-in customers (shown by name), you can use Customers → Send an Email to send them a personalized recovery email.
- Consider offering a discount code in your recovery email to incentivize completion of the purchase.
- Note the most commonly abandoned products — they may indicate pricing issues, shipping cost concerns, or checkout friction.
📉 Conversion Rates
Shows the ratio of visitors who completed a purchase versus total visitors. Conversion rate is one of the most important metrics for measuring ecommerce performance.
| Metric | What It Means |
|---|---|
| Sessions | Total visitor sessions in the time period. |
| Transactions | Number of completed orders. |
| Conversion Rate | Transactions ÷ Sessions × 100. Industry average is 1–3%. |
📅 Order Statistics
Provides a date-based summary of orders — total orders, total revenue, and average order value — grouped by day, week, month, or year. Use this for revenue tracking and financial reporting.
Generating an Order Statistics Report
- Navigate to Statistics → Order Statistics.
- Select the desired date range (current month, last 30 days, custom range).
- Select the grouping: Daily, Weekly, Monthly, or Yearly.
- Click Generate Report. The table populates with order counts and revenue totals.
- To export for accounting: use the Order Information → Export Orders feature filtered by the same date range.
📜 Audit Trail
The Audit Trail records every significant action performed in the admin panel — who did what and when. This is your complete activity log for compliance, troubleshooting, and accountability.
| Column | Description |
|---|---|
| Date/Time | Exact timestamp of the action. |
| Admin User | Which admin account performed the action. |
| Action | Description of what was done (e.g., "Product Updated: Guitar Model XYZ", "Order Status Changed to Shipped"). |
| IP Address | The IP address of the admin at the time of the action. |